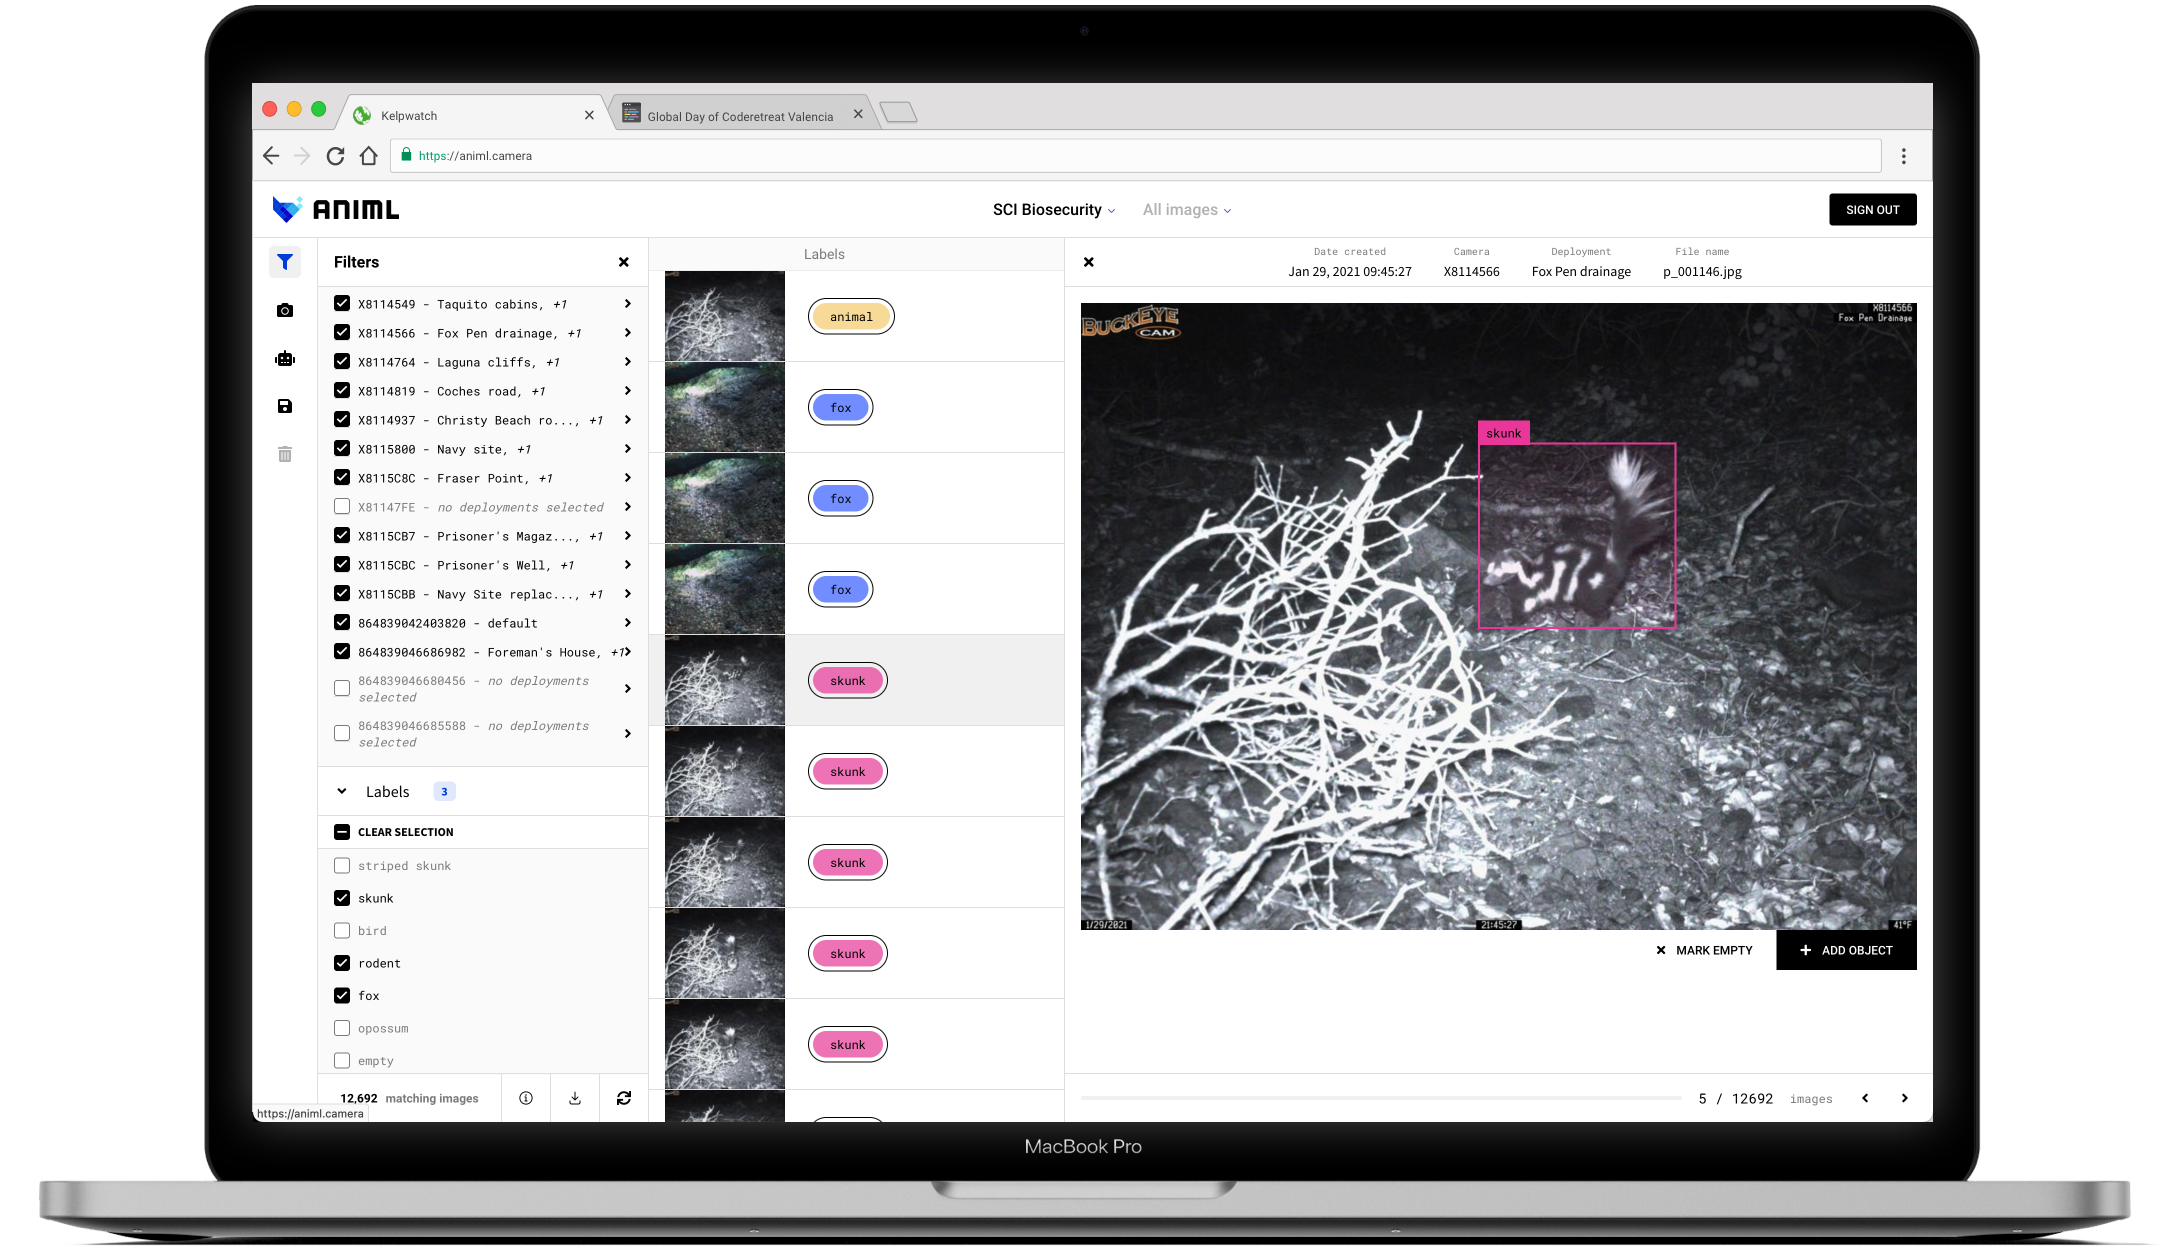
# Welcome to Animl

Animl is an open-source platform for managing camera trap data, built by The Nature Conservancy

<figure><img src="/files/qLUtBdZFFWlSlkcgZNKu" alt=""><figcaption></figcaption></figure>

## Overview

[Animl](https://animl.camera/) was designed to:

1. **accept camera trap data from a wide variety of camera trap types**, integrate real-time data streams from wireless camera traps (VHF radio-based cameras, cellular cameras) or upload images in bulk from traditional, SD-card cameras
2. **allow for the rapid deployment and integration of multiple machine learning models** that may be suited for different environments, different target species, or different business use cases
3. **empower users to configure custom machine learning pipelines** to automatically predict what’s in their images – and weed out empty images if nothing is detected
4. **send automated alerts** if a species of concern is detected
5. **allow users to query, filter, and sort images**, review and validate ML-predicted objects and labels, and manage users and their permissions for collaborative image review
6. **Export images and labels** for use in downstream data analysis/modeling and machine learning training

## Digging deeper

Curious about how AI works on camera trap data and what Animl might be able to do for you? We recommend reading through the pages below as a starting point:

{% content-ref url="/pages/oqz1IgmUSgXsg7ZxITmM" %}
[Intro to AI for processing camera trap data](/getting-started/intro-to-ai-for-processing-camera-trap-data)
{% endcontent-ref %}

{% content-ref url="/pages/IMobIhzgHYO6DsAGhfId" %}
[How AI works in Animl](/getting-started/how-ai-works-in-animl)
{% endcontent-ref %}


# Intro to AI for processing camera trap data

A primer on using machine learning to assist with species recognition

Individual camera traps can easily produce tens-of-thousands of images, many of which are empty, so using artificial intelligence (AI) - or, more specifically, machine learning (ML) - to help process and prioritize these data can lead to [significant efficiency gains](https://www.sciencedirect.com/science/article/pii/S2351989422001068). That said, it's important to manage expectations about what machine learning can and cannot do in the context of your camera trap workflow, as well as understand the different types of machine learning "[models](https://developers.google.com/machine-learning/glossary/#model)" and what they're used for.

{% hint style="info" %}
**Machine learning life cycle**

The following assumes some understanding of the typical ML model development life cycle - from data collection and annotation to training, deployment, and inference. If you are unfamiliar with the ML life cycle, a good overview can be found [here](https://neptune.ai/blog/life-cycle-of-a-machine-learning-project).
{% endhint %}

## ML offers increased efficiency, not automation

From a consumer's perspective, in just a few short years we've become accustomed to increasingly powerful AI, which is why it's understandable why many people assume that predicting what kind of animal is in a camera trap image should be a relatively trivial computer science task. Unfortunately, however, for a variety of reasons AI-assisted species classification in camera trap images is very difficult (more on that below), and it's important to set expectations about what it can do for you accordingly.

For example, at the moment, there is no single, general-purpose model that can predict with reasonable accuracy any and all species you might encounter with your camera traps (the most advanced attempt to do this is Wildlife Insights, which performs well on common species but struggles with less-common ones).

And you shouldn't necessarily expect perfection from bespoke models trained on your own data and tailored to the environments and species you're interested in detecting, either. Although custom classifiers will perform a lot better on your unique datasets, ***for use cases that have a low-tolerance for false negatives/positives, even a model that is 95% accurate may require a manual review of most if not all images***.

But don't despair! The benefits of AI for camera trapping are real and growing, but they should be thought of in terms of efficiency gains - greatly speeding up manual review performed by "humans-in-the-loop" or quickly surfacing the most important/interesting images - rather than full-on, hands-off automation. We are in the "driver assist" stage, and it may be some time before we have a reliable and affordable self-driving car.

{% hint style="info" %}
**Why ML is hard with camera trap images**

In pictures taken by humans typically it's obvious what the photo is of: the subject is in focus, it’s in the center of the frame, and it's probably not obscured by something in the foreground. If you are looking for training data to train a teapot classifier, you can do a Google Image search and find a million clear examples with different shapes, sizes, colors, angles, and backgrounds, and that sample diversity combined with subject clarity is going to help the model learn what makes makes a teapot a teapot pretty easily.

With camera trap images, on the other hand, the subject might be 2 inches away from the camera - completely out of focus and taking up the whole frame - or 20 feet away and 90% obscured by a bush. It might be blurry because it’s moving, barely visible because it's out of flash range, or pixelated because of file corruption; the quality and composition of the images is just far less controlled. Not to mention, for rare species (which, for conservation purposes, are often the ones you care the most about), you likely have a very limited number of sample images (this is known as a long-tail distribution problem). Given the nature of the data, it makes sense why teaching an algorithm to learn what a species looks like from camera trap images is a challenging task. [Garbage in, garbage out](https://en.wikipedia.org/wiki/Garbage_in,_garbage_out), as they say.&#x20;

What’s more, your training data might include two hundred thousand images (a lot of samples), but they might have only been taken at just 12 locations, and of course the backgrounds of images from the same location don’t change much. So what typically happens is that the models tend to get really good at detecting animals in very specific locations (i.e., those that they were trained on), but as soon as you point the camera somewhere else, or use the model in a new environment, the performance plummets because the models have learned too much about the background and foliage in the training data and can’t [generalize](https://developers.google.com/machine-learning/glossary/#generalization) to other environments.
{% endhint %}

## Types of ML models

For our purposes, you can group ML models into three buckets: ***Object Detection*** ***models***, in which the model is given an entire image and its job is to detect whether there are any "objects" of interest within it,  ***Classification models*****,** which either take a full or cropped image as input and try to predict what "[class(es)](https://developers.google.com/machine-learning/glossary/#class)" are present (in our case the classes would likely be species), and ***Re-identification*** ***models***, which are trained to identify whether two animals are the same individual or not.

These three types of models solve different problems and are useful for different use cases, but they can also be used together sequentially in different stages of a machine learning [inference](https://developers.google.com/machine-learning/glossary/#inference) pipeline.

### Object detection&#x20;

Object Detection models perform a high-level but crucial service and are often the first model to be invoked in an image recognition pipeline. As mentioned above, their job is to identify objects of interest within an image and return a "bounding-box" that describes where in the image the objects are located. Object Detection models can also be trained to return "classes" along with their bounding-boxes (i.e. this box contains a *person*, this box contains a *car*), but the classes are often intentionally very high-level.

Thanks to Microsoft's AI for Earth team, the challenge of detecting objects in camera trap images has essentially been solved. [Megadetector](https://github.com/microsoft/CameraTraps/blob/main/megadetector.md), a highly accurate, open-source model that Microsoft developed & trained on [millions](https://github.com/microsoft/CameraTraps/blob/main/megadetector.md#can-you-share-the-training-data) of camera trap images from a wide variety of environments, is the gold standard for this stage of the pipeline.

Out-of-the-box, it can detect and return bounding boxes for three classes (animal, person, or vehicle), but perhaps most importantly, if it doesn't return any objects you can assume that the image is empty. Because camera traps produce so many empty images due to false triggers from moving foliage, shadows, etc. (often > 60%) , the value of separating empty images from images that contain something of interesting is enormous.

Megadetector is used by a large and growing [list](https://github.com/microsoft/CameraTraps/#who-is-using-megadetector) of researchers and conservation organizations, and in our experience we've been very impressed by its performance. That said, like all ML models it's not perfect, and how well it is able to detect animals depends on the species, how the cameras were set up, the complexity of the backgrounds, and many other variables.

### Classification

Object detection models like Megadetector help you weed-out empty images or tell you whether there's an animal in the photo, but if you need finer-grained classification - i.e. a species-level prediction - that's where classifiers come in.&#x20;

[Classifiers](https://developers.google.com/machine-learning/glossary/#classification-model) take an image as input and return a class as output (technically they return a list of classes and percentages indicating how confident they are that the image contains each class). When trained on a lot of images of each species you want to classify, and taken in an environment that is very similar to the one you'll be ultimately using the model in, classifiers can get quite good. If you have training data taken by the *exact* *same* cameras in the *exact* *same* locations that the models will be used on, they can become excellent.

The challenge is that as soon as the real data starts to look different from the training data the performance starts to suffer: even small changes like pointing a camera in a new direction can significantly impact accuracy (see note on "Why ML is hard with camera trap images" [above](#ml-increases-efficiency-not-automation)). If you try to use the model in a totally new environment that may have the same animals but different flora, it will likely struggle even more. The problem is that the nature of camera trap data makes it hard for classifiers to [generalize](https://developers.google.com/machine-learning/glossary/#generalization) to new, unseen environments, and it's one of the reasons we don't have a single, general-purpose classifier that can predict every species in every environment under the sun.

Instead, if you need species-level classification with a high degree of accuracy, your best bet is to train your own classifier with your own data. Training a classifier is outside of the scope of this document, but once you develop your own training data set (labeling a lot of images), you essentially have two options:&#x20;

* manually train the classifier yourself (or with the help of a data scientist) - this typically requires at least intermediate experience with the Python programming language and familiarity with deep learning and [convolutional neural net](https://developers.google.com/machine-learning/glossary/#convolutional-neural-network) (CNN) concepts, as well as access to a computer with a [GPU](https://towardsdatascience.com/why-deep-learning-uses-gpus-c61b399e93a0). If you're interested in learning more about manual classifier training, we recommend checking out [Sara Beery's Wildlabs webinar](https://www.wildlabs.net/event/how-do-i-get-started-using-machine-learning-my-camera-traps) on the topic as a starting point.
* use an "Auto ML" service like Google's AutoML or Zendo, which automate a lot of the training process and allow users with minimal technical background to train classifiers. The downside of this approach is that training models is part science, part art, and without a human actively participating in the training, evaluating where the model is struggling, and intervening to improve it, the ceiling for how well an auto ML-trained classifier can perform is generally lower than that of a manually trained one.

One last note on classifiers: classifiers are only capable of making predictions about classes that they have been trained on, and they don't know anything else about the world. If they encounter an animal that was not present in the training data, they won't be able to recognize that it is a novel animal that they've never seen before. In other words, ***they aren't capable of applying a generic "unknown" label to new species***. In data science parlance this is called an “anomaly detection” or [“open-set” classification](https://journals.plos.org/plosone/article?id=10.1371/journal.pone.0238302#:%7E:text=Open%20set%20classification%20\(OSC\)%20is,an%20incorrect%20label%20%5B3%5D.) problem and it's difficult to do with [CNNs](https://developers.google.com/machine-learning/glossary/#convolutional-neural-network). What this means is that for a model to perform well, you ideally want a comprehensive training dataset that includes samples of all of the animals you might encounter, even if you really only care about classifying a subset of them.&#x20;

### Re-identification (Re-ID)

The Re-ID training process involves sending the model three images at once - all three of which are the same species but two are the same individual - and rewarding it when it guesses correctly which two are the same. In effect, you’re training the model to understand what features can be used to distinguish between individual animals within an entire species. For species with visually distinctive "fingerprints" (zebras, whale sharks) this approach can help you determine if two animals are the same, which can be useful in population modeling.


# How AI works in Animl

## Background

For the foreseeable future, we expect that a single ML model will probably not emerge that can meet everyone's camera trap image classification needs. Instead, the ML landscape for camera traps will look more like a mosaic of smaller, niche models designed for specific conservation use-cases, different environments, and different target species.

In order to support this, we designed Animl to be as flexible and model-agnostic as possible. In other words, we see Animl as a platform that allows users to rapidly deploy their own domain-specific classifiers and integrate them into their image processing pipelines. In addition to Bring-Your-Own-Model (BYOM) support, Animl offers some high-level, general purpose algorithms - like Megadetector v5a and v5b - out of the box for anyone to use.

## Object detection out of the box

Every new Project has access to [Megadetector](https://github.com/microsoft/CameraTraps/blob/main/megadetector.md) to perform [object detection](/getting-started/intro-to-ai-for-processing-camera-trap-data#object-detection). Megadetector does a fantastic job of identifying whether or not there's an object of interest in an image, effectively allowing users to filter out empties automatically. If there is an object of interest in the image, Megadetector also draws a bounding box around it and attempts to predict whether object is a person, vehicle, or animal.

Animl also allows users to configure settings for all of the models they use - including Megadetector - so, for example, if you are unlikely to see any vehicles in your camera trap data or simply don't need to label them and don't want to deal with invalidating any false positives that might arise, you can simply turn off that label in your Megadetector [Automation Rule settings](/fundamentals/automation-rules#creating-an-automation-rule-for-ml-inference). You can also adjust the confidence thresholds up and down for each label Megadetector (or any other model) returns, allowing you to optimize performance for your unique data sets and labeling needs.

<div><figure><img src="/files/FpWYYg3agk2bvIU4KrIv" alt=""><figcaption><p>An image that Megadetector predicted was empty</p></figcaption></figure> <figure><img src="/files/uEhaWGBbOAtEjr04MoWa" alt=""><figcaption><p>An image that Megadetector predicted had an Animal in it</p></figcaption></figure></div>

## Deploying new models/classifiers

Currently, the deployment of new models is a semi-manual process that TNC will have to assist you with. If you have a classifier and you're interested in deploying it for use in your Animl project, contact Nathaniel Rindlaub at \<first name>.\<last name>@tnc.org.

## Creating an inference pipeline with Automation Rules

It's often desirable to run images through a sequence (or pipeline) of ML models that perform different functions. For example, if you have a classifier that can distinguish between deer, bears, and mountain lions, it would be a lot more efficient to request Megadetector predictions first, and then, if it thinks that there's an animal present, send that image along to your classifier to try to determine what kind of animal it is.

Another advantage to chaining object detectors and classifiers is that Animl will automatically pass along the bounding-box that was generated in the object-detection stage and use it to crop the background out of the image before sending it to the classifier for inference. Because the [backgrounds are often what makes image classification hard on camera trap images](/getting-started/intro-to-ai-for-processing-camera-trap-data#ml-offers-increased-efficiency-not-automation), stripping as much of it out as possible will make classification predictions much more accurate.&#x20;

Animl's flexible Automation Rules support all of this by allowing users to [completely control and customize their pipelines,](/fundamentals/automation-rules#chaining-together-automation-rules-to-create-inference-pipelines) deciding which models their images are submitted to, under what conditions, and in what order.&#x20;

<figure><img src="/files/TK8O69lebXiOnYnf27Qy" alt=""><figcaption><p>Multiple suggested labels indicate that multiple models have been chained together and made predictions. In this case, Megadetector predicted an "animal" in two of the images, which then triggered a second-round of inference from a custom classifier, which predicted that the animal was a "fox".</p></figcaption></figure>

## Using Animl to develop training datasets

It's important to note that Animl does not learn or improve on its own, nor does it allow users to automatically train their own classifiers (training classifiers is out of the scope of this documentation, but a brief summary can be found [here](/getting-started/intro-to-ai-for-processing-camera-trap-data#classification)).&#x20;

What it does help you do is provide a user interface and user management system for developing  a labeled training dataset, which can then be [exported](/fundamentals/export-data) and used to train new classifiers/models in an environment suited for deep learning. In fact, if you are using Animl to structure and label your data for any other reason, you are also inadvertently creating a training dataset that might be useful for developing your own bespoke classifier down the road.

There are many other more general purpose tools out there that help you develop labeled training data for image classifiers, but Animl offers a handful of features geared towards addressing some of the unique challenges involved with training ML models for camera traps. For example:&#x20;

* if you're using Megadetector, you will ***automatically have bounding boxes generated*** for you, thus dramatically reducing the time it takes to label your images because you don't have to manually draw each one
* The ***bounding box information is exported along with your labels***, allowing you to crop the backgrounds out of your training images before you initiate training
* ***location information - i.e., what*** [***deployment***](/getting-started/structure-concepts-and-terminology#deployments) ***the image came from - is also exported***, which can be critical when training camera trap classifiers. Because one of the challenges of ML with camera trap data is that the models tend to learn too much about the backgrounds of the images they've been trained on, it is often a good strategy to try to mitigate this by splitting your data into training, validation, and test sets by location.


# Structure, concepts, and terminology

Understanding how projects, users, and data are organized

## Projects

At the highest level, *Projects* are a way to organize cameras/deployments used for different purposes and that have different user bases. Each *Project* owns its own set of *Users*, *Cameras*, *Deployments*, and *Images*, which are all only accessible to users who have been granted the appropriate permissions for a given Project. NOTE: Users can belong to more than one Project and have varying levels of project roles across different projects.&#x20;

Please reach out to Nathanial Rindlaub at <nathaniel.rindlaub@tnc.org> if you need to create a new *Project*.

## User management & project role levels

Only Project Managers (level 3, see below) can add/remove users and manage project roles. See the "User management" section for more details.

There are three project role tiers available:

* **Level 1 - Project Observer -** Project Observers have read-only roles. This may be useful in certain situations, e.g., to allow ecologists or researchers outside of your organization who want to view reviewed, validated data for research purposes but don’t necessarily need to edit the data.
* **Level 2 - Project Member -** Project Members can help review and edit image *Labels* and can create *Views* to help with their review workflow. They cannot edit inference pipelines, edit deployments, or register/release *Cameras*.&#x20;
* **Level 3 - Project Manager** - Project managers can register and release *Cameras* to their *Projects*, configure inference (machine learning) pipelines and *Alerts*, see all *Images* that belong to their *Projects*, and edit *Labels*. They can also create and edit *Views,* add and manage project member permissions, and upload images directly from their computers.

## Filters

Image query filters allow the user to view a subset of images. Users can filter by deployment/camera, date created, date ended, labels, reviewed/not-reviewed, etc.)

## Views

*Views* are saved combinations of filters that users can freeze and return to for fast access or sharing with other users in their *Project*. For example, you might have a *View* called “Images that need reviewing” which could show images that have yet to be reviewed. NOTE: The default *View* is “All Images” (no filters applied), and cannot be edited or deleted.

## Automation rules

Users can configure *Automation Rules*, which are simply actions to take (e.g., send email, request machine learning prediction) after certain events occur (e.g., an image is added, label is added). Automation Rules are set at the *Project* level, so an automation rule set for a specific *Project* will apply to all images that are added to that *Project* going forward. Automation Rules do not retroactively get applied to images that are already in your *Project.*

## Cameras

*Cameras* are representations of individual, physical cameras in the real world and are uniquely ID'ed by the cameras' serial number.

*Wireless Cameras* are a special variant of *Cameras* and represent cellular and other wireless camera traps who's data streams can be integrated into Animl and processed in real time. Unlike regular *Cameras,* before you'll be able to ingest any images from your *Wireless Camera* traps, you must first register them with your *Project*. If the camera’s serial number is already registered/paired with another *Project*, you will be unable to register it to your own, so it’s important when transferring a camera between *Projects* to release it first.

## Deployments

Over the course of a camera’s life, it may be deployed multiple times for multiple purposes and across multiple *Projects*. So in essence a *Deployment* is just a set of *Images* taken by a *Camera* between two dates at a single location.&#x20;

In Animl, it’s maybe most helpful to think of *Deployments* simply as a data management tool, and they’re quite flexible: you can create *Deployments* retroactively and adjust their start dates and other metadata whenever you want. Every camera that is registered or was registered at some time to a *Project* has an un-editable Default deployment, with no start date, which serves as a fallback for images that may enter Animl but were taken earlier than the start date of the earliest user-defined *Deployment*.

## Images

*Images* are both the image files themselves as well as their associated metadata.

## Objects and Labels

An *Object* represents any object/thing (animal, person, vehicle, etc.) that was identified within the image. Each *Object* will have a “bounding box”, or rectangle defining its extent and location within the *Image*.

*Labels* describe an *Object* (e.g., “animal”, “rodent”, "sasquatch"). *Objects* can have multiple *Labels*, and *Labels* can be created from either machine learning model predictions or users. The reason *Objects* can have multiple *Labels* is because multiple machine learning models might have different predictions for the same *Object,* and human reviewers might want to override/add their own *Labels* to *Objects* as well.&#x20;

Users can “validate” or “invalidate” *Labels* produced by machine learning models. If a user validates a *Label*, that object will become locked, and that validated *Label* will appear as the “winner” (the most specific & accurate *Label* associated with that *Object*). However, users can always unlock objects, invalidate previously validated *Labels*, or add new ones manually to override *Labels* that had been applied earlier.

<figure><img src="/files/aGrDkVb6COgumEE8QCRy" alt=""><figcaption><p>"Unlocked" Objects are represented by dotted lines encircling the available Labels/ML predictions (list on the left) and dotted lines for bounding boxes (image on the right)</p></figcaption></figure>

<figure><img src="/files/QHTiZduBCUQXQHIxb1l6" alt=""><figcaption><p>"Locked" Objects have solid lines</p></figcaption></figure>

## Tags

*Tags* offer another way to annotate images. *Tags* differ from *Objects* and *Labels* in two ways: (1) they can only be applied by humans, not by ML models, and (2) they are used to describe something about the entire image, rather than something within the image.

For example, if you wanted to annotate your images as having been "viewed" or "double-checked", you could create *Tags* to represent those states, and apply them to your images to indicate to other users that they have been seen. Some other examples of use-cases for "image-level" *Tags* include:

* describing images' reviewed state, e.g.: "**viewed**", "**retired**", "**double-checked**"
* marking certain images as "**interesting**" or "**favorite**"
* describing the presence or absence of a certain animal, e.g. "**rat**" and "**no-rat**"
* describing an animal behavior or animal interaction, e.g. "**predation event"** or "**first Hawaiian petrel sighting of season**"

<figure><img src="/files/12C2AHEy1lWzNlDCVyn5" alt=""><figcaption><p>Tags appear below the Image and describe something about the entire Image, rather than something within it</p></figcaption></figure>

Project Managers are responsible for creating and maintaining the list of allowable *Labels* and *Tags* that can be applied to images in their Project. For instructions on how to manage Labels and Tags, see the [Image Review](/fundamentals/image-review#managing-labels-and-tags) section of the documentation.


# Uploading images

How to upload images to Animl in bulk from your desktop

## Overview

In addition to linking and ingesting images in real-time from wireless camera traps, Animl supports directly uploading camera trap images in bulk from your computer. The process is simple: you package your images in a Zip file, upload them to your *Project* via the bulk upload interface, and then Animl takes over and does the rest. Behind the scenes, Animl is marshaling hundreds of parallelized computers to make your machine learning processing jobs as fast and reliable as possible.

<figure><img src="/files/WVo6eD4iXH9r8boCFeVy" alt=""><figcaption><p>Animl Bulk Upload interface</p></figcaption></figure>

## Before you begin

### Requirements

Animl is highly flexible and can consume images from most camera trap types, but there are a few requirements to be mindful of:&#x20;

1. The maximum file-size of **the Zip file can not exceed 50 GB**. If your dataset is larger than 50 GB, you'll have to break it in smaller batches and zip and upload them individually.&#x20;
2. Animl only processes `.jpg` and `.png` files it finds within the Zip file. It doesn't support video or any other file type.
3. The maximum file size for each individual image file is 8 MB.
4. Each image must have two fields present it its [Exif metadata](https://en.wikipedia.org/wiki/Exif): a `DateTimeOriginal` field indicating when the image was created, and a `SerialNumber` field indicating what camera took the image. Nearly all images should have `DateTimeOriginal` fields, but some common camera trap manufactures and models do not provide `SerialNumbers` (see table below for list of known camera traps that do not support `SerialNumbers`).&#x20;

| Camera traps with serial numbers | Camera traps without serial numbers |
| -------------------------------- | ----------------------------------- |
| Reconyx - Hyperfire              | Reconyx - MR5 Microfire             |
| Buckeye X80 / UWS                | Cuddelink / Cuddeback               |
|                                  | Browning / Prometheus               |
|                                  | Bushnell                            |
|                                  | Exodus                              |
|                                  | Little Acorn                        |
|                                  | RidgeTec                            |
|                                  | SpyPoint                            |

{% hint style="info" %}
If you're trying to upload images from a camera make that is not listed below and you're not sure whether or not your images' metadata contain `SerialNumbers`, the best way to check is with Phil Harvey's Exiftool (<https://exiftool.org/>).
{% endhint %}

If you are uploading images from camera(s) without Serial Numbers, be sure to follow the [instructions below](#overriding-serial-numbers) on using the Serial Number Override feature.

### Check your Automation Rules!

Before uploading a batch, it's worth double checking that you *Project*'s [*Automation Rules*](/fundamentals/automation-rules) are configured appropriately for your data processing needs. All images you upload will be processed according to the *Automation Rules* you've configured, and if you don't have any *Automation Rules* configured, Animl will save the images to your Project but it will not make any machine learning predictions.&#x20;

### Upload workflow and processing time

The upload and batch processing workflow involves the following steps:

* **Step 1: uploading file** - the Zip file is uploaded from your computer to Animl's backend.
* **Step 2: preprocessing** - the file is unzipped, the files within it are validated, the parallelized  computers that will support the machine learning processing are deployed, and the images are saved to the Animl database.
* **Step 3: processing** - the images are processed by the pipeline of machine learning models you've defined in your *Automation Rules.*
* **Step 4: cleaning up** - the processing computers are shut down. Once you reach this step, your images and their predicted label are ready for your review; you don't have to wait until it's finished cleaning up!

The amount of time it takes to upload your file will depend on the speed of your internet connection. For reference, with an upload speed of 360 Mbps, a 10 GB zip file would take under 4 minutes to upload. If you're curious, you can estimate the upload time for your files with a file upload time calculator (<https://www.uploadtimecalculator.com/>).

Once the file has been uploaded, the remaining processing time depends on (a) how many images are in your batch, (b) how many ML models you are invoking in your processing pipeline, and (c) how many other users are also processing batches of images at the moment.

If no one else is using the bulk upload functionality and you're only requesting predictions from one model (Megadetector, for example), ***Animl can process  \~11-12 images per second, meaning processing a batch of 100k images should take about 2.5 hours to complete.***

{% hint style="info" %}
**When it's safe to close your browser window**

Large bulk uploads can take many hours or even days to fully process, but you don't have to keep your browser window open and logged into Animl that whole time. Once the Zip file is fully uploaded to the backend (i.e., after Step 1 is complete), you can close the window and check back in later.
{% endhint %}

## Uploading a batch of images

After you've Zipped up your batch of images, click on the "Bulk Upload Images" icon in the left-hand sidebar, and click "Choose File" and select your Zip file (you can also drag & drop the Zip into that input field).

If you're sure you're uploading images that contain `Serial Numbers` in their Exif data, initiate the upload by clicking "Upload". A green progress bar will appear to indicate the progress towards completing the file upload (Step 1, described above). If your images do not contain `Serial Numbers`, you'll have to follow the additional steps outlined below before uploading.

<figure><img src="/files/e29a4oy1HE3ZbfewGolY" alt=""><figcaption></figcaption></figure>

### Overriding serial numbers

If your images *do not* include a camera `Serial Number` field in their Exif metadata, Animl has no way of knowing which Camera the images belong to, so you will have to manually provide this information by adding your own "serial number" to the the Serial Number Override input field.&#x20;

"Serial number" is in quotes because it can be any string you'd like to use to uniquely identify that particular Camera. The only requirements are that the value can't contain spaces or special characters, and it must be unique to your Project. If a Camera already exists in your Project with the same "Serial Number", the images will be grouped together and associated with that existing Camera. There's nothing wrong with that per se, and in fact it may be desirable (for example, if you're uploading a fresh batch of images from a camera you've already uploaded some images from).&#x20;

Additionally, it's important to note that ***the value you provide in the Serial Number override field will be applied to ALL images in the Zip file.*** So if you have images from multiple cameras, some or all of which do not have `Serial Numbers`, you'll have to zip up and upload images from each camera separately, each with separate & unique Serial Number Override values. This is not a requirement if all of your images are from cameras that include Serial Numbers (if that's the case, a single Zip file can contain images from multiple cameras and Animl will sort them and associate them with the correct cameras automatically).

### Monitoring progress

While the Zip file is being uploaded to Animl (i.e., Step 1, as described above), a green progress bar will appear directly below the upload form, and once the database has a record of the batch upload, an entry will appear in the table below with a status of "Uploading file...":

<figure><img src="/files/CpAQeCWJkzSnqVJv7MvT" alt=""><figcaption><p>Bulk upload interface while a file upload is in progress</p></figcaption></figure>

Once Step 1 is complete, the green progress bar will disappear and the remaining processing can be monitored with the bulk upload table entry. At this stage, you also no longer have to keep the bulk upload popup or the browser window open; feel free to sign out entirely and return back any time to check in on progress.

{% hint style="info" %}
Note: if you click off of the upload dialogue box, simply click back on the upload icon again.
{% endhint %}

Another thing to note is that during the machine learning processing stage (Step 3), Animl provides an estimate of the number of images it's processed, but this number is not always accurate (especially on batches of relatively few images), and at times it may even appear to reverse progress briefly before continuing to grow again. Despite not being perfectly accurate all of the time, it's still a very useful indicator of progress.

<figure><img src="/files/gAbDEmi0fGHxdm5ddaDt" alt=""><figcaption><p>Bulk upload interface while images are being processed</p></figcaption></figure>

{% hint style="info" %}
**No need to wait around for clean up**\
Once the "Status" reads "Finished processing images. Cleaning up...", your upload has finished processing and your images and predictions should be ready for review. Feel free to close out of the bulk upload popup and check them out!
{% endhint %}

### Viewing results

Once your upload has finished processing, you can close out of the bulk upload model and view the images and predicted labels. If the images are not immediately present in the Animl user interface, you may have to click the "Refresh data" button at the bottom of the Filters Panel.

<figure><img src="/files/iWfjNnLSFp6RjNLLo7ig" alt=""><figcaption><p>Refresh data button</p></figcaption></figure>

### Dealing with errors

If the warning icon to the right of the bulk upload entry turns red, it means that one or more errors occurred while processing your images. To download a complete CSV of all of the errors that occurred, click the warning icon and open the CSV in a spreadsheet editor to view each image attempt and the reason it failed.

<figure><img src="/files/dr8fWE5TUa4RPUgwp03d" alt=""><figcaption><p>Click the error warning icon to download a CSV of the image errors that occurred during upload and processing</p></figcaption></figure>

Errors can occur for a number of reasons, and some can be ignored (for example, `Duplicate Image` errors). Certain errors, however, may be remediable. For example, if the errors indicate that certain images failed to be saved because they had `Unknown serial number` errors, you can attempt to re-upload them using the [Serial number override feature](#overriding-serial-numbers).&#x20;


# Image review

Humans aren't obsolete yet! Many use-cases require reviewers to be kept "in the loop" to correct any mistakes made by the ML models and fill gaps in their classification repertoire.

## Understanding the Object/Label and Tag data models

Before moving on, it's important to first understand the *Object,* *Label, and Tags* data models, which are described in the [Structure, concepts, and terminology](/getting-started/structure-concepts-and-terminology#objects-and-labels) pag&#x65;*.*

## Managing Labels and Tags

Project Managers are responsible for creating and maintaining the list of allowable *Labels* and *Tags* that can be applied to images in their Project. This adds an additional setup step, but it is a useful tool for keeping your image annotations clean and consistent and it offers other users some guidance on how you'd like your images reviewed.

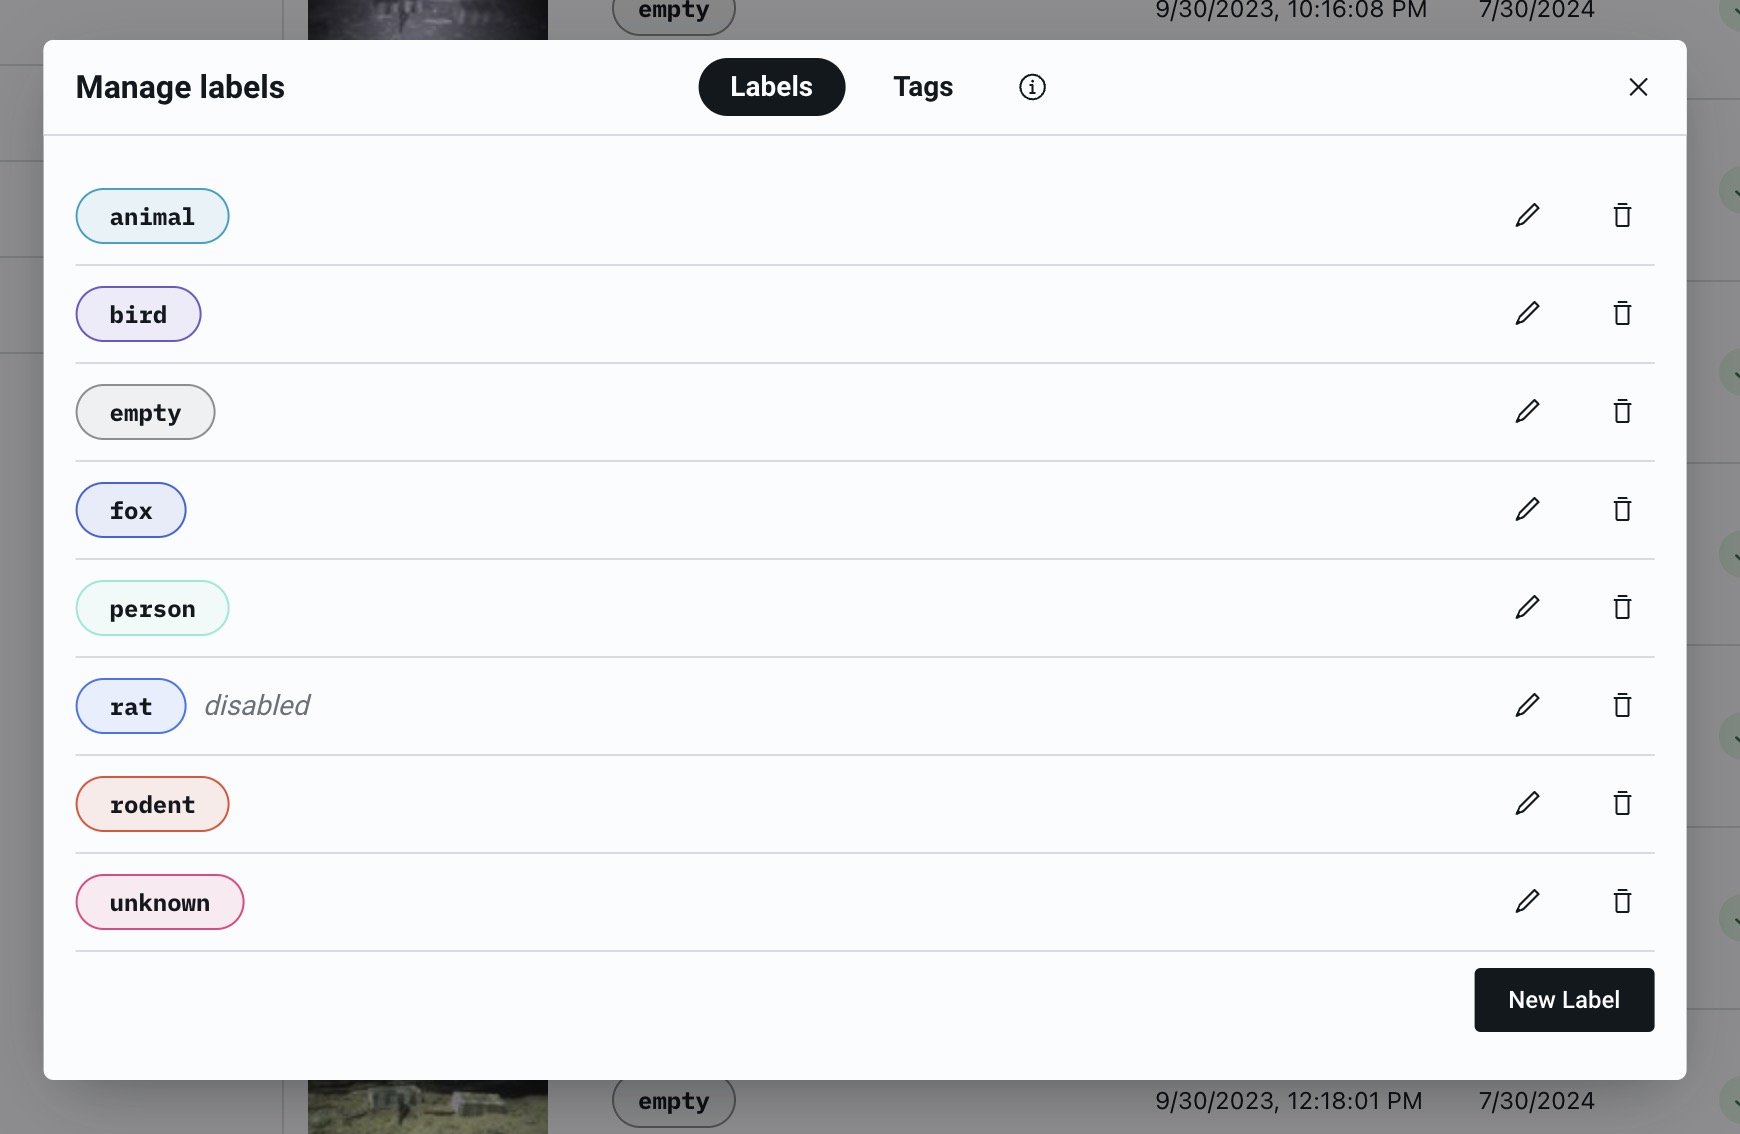
To create, update or delete your Project's Labels and Tags, select the "Manage Labels and Tags" button from the sidebar menu. From the popup that appears, you can:

* **Create new Labels and Tags**
* **Edit the the name and color of existing Labels and Tags**
  * *Note: if the Label/Tag has already been applied to Images and Objects, editing it will also update all existing instances*
* **Delete Labels and Tags**
  * *Note: deleting a Label/Tag will:*
    * *remove it as an option to apply to your images (if this is your only goal, this can also be accomplished by "disabling", rather than deleting, the label.)*
    * *remove all instances of it from your existing images*
    * *if deleting a Label, and the Label has been validated as the correct, accurate label on objects, deleting it will remove the Label and unlock those objects, which will revert all affected images to a "not-reviewed" state*
    * *<mark style="background-color:red;">THIS ACTION CANNOT BE UNDONE</mark>*
* **Edit the enabled/disabled state of Labels**
  * *Note: disabling a Label will prevent users from applying it to images going forward, but it will not remove existing instances of the label on your images.*

<figure><img src="/files/UxawIoKXIZctvAkfK8Er" alt=""><figcaption><p>Manage your Project's Labels and Tags</p></figcaption></figure>

{% hint style="info" %}
Note: machine-learning-generated *Labels* are added to your Project's list of allowable Labels automatically if any are predicted that aren't already included in your list.
{% endhint %}

## Keyboard shortcuts

* We highly recommend using the **WASD** or **arrow keys** to navigate forward and backwards through images while you're reviewing them. This allows you to use the keyboard to iterate through the images with one hand, while your other hand is free to use the mouse/track-pad to validate or edit Labels, apply Tags, etc.
* Undo *Label* editing actions with **ctrl-z**, and redo them with **shift-ctrl-z**

## Reviewed vs. Not-reviewed Images

An *Image* is considered "reviewed" once all *Objects* are locked (either a user has validated an ML-predicted *Label*, manually added their own *Label*, or invalidated all of the proposed *Labels* thus removing the Object).

## Validating / invalidating / editing Labels

If a user "validates" a suggested *Label*, the *Object* will become "locked", and the most recently validated Label will become the "winning" *Label*. "Invalidating" a *Label* will remove that *Label* from view (invalidated labels are still tracked in the database, however), and if it was the only non-invalidated Label suggestion associated with that Object, the whole Object will be removed from the Image. However, if there are more non-invalidated Label suggestions associated with the Object, the next non-invalidated Label will be displayed for the user to review.

{% hint style="info" %}
**Adjusting bounding boxes**

While an *Object* is "unlocked", you can also move its bounding box by clicking and dragging its center or adjust its dimensions by clicking and dragging its corners.
{% endhint %}

There are a few ways to edit *Labels* that have been predicted by ML model&#x73;*:*&#x20;

1. **Right-clicking** a bounding box will open a menu of Label-editing actions:

<figure><img src="/files/YIXWstC2MGacS6CVqPAn" alt=""><figcaption><p>Right-click an Object to open the Label-editing menu</p></figcaption></figure>

2. **Hovering** over a bounding box will reveal Label Validation / Invalidation buttons:

<figure><img src="/files/LB85I6IDN5jdjpVI4BUh" alt=""><figcaption><p>Hover over an Object to reveal validation / invalidation buttons</p></figcaption></figure>

2. **Clicking** on the Label will open the Label editing and selection menu and allow you to manually enter new Labels. You can exit the Label editing mode by clicking anywhere on the screen.

<figure><img src="/files/8KFBs62ZIv90WOMaDJqh" alt=""><figcaption><p>Click a Label to edit it directly</p></figcaption></figure>

## Adding new Objects

To add new objects, either select the Add Object button located below the image, or right-click the image and select the Add Object item from the menu. Then simply **click, hold, and drag the cursor down and to the right** to draw a bounding box around the animal or object you'd like to annotate. When you let up on the click, the edit Label input automatically pops up and users can enter a new Label.

If you plan on using your labeled data to train a machine learning model, it's worth reviewing these [labeling best practices](https://blog.roboflow.com/tips-for-how-to-label-images/).&#x20;

{% hint style="info" %}
**Draw tight bounding boxes**

If you plan on using your annotated images for machine learning training data in the future, it's best to keep the bounding box as tight around the [animal ](#user-content-fn-1)[^1]as possible. When it comes time to train a new model, this will allow you to crop out as much of the background as possible, which can confuse machine learning classifiers.

![](/files/6v7cVg6Pc34GPTM2vZO9)![](/files/XFrhA6VHHjmXN4LWLqIt)
{% endhint %}

## Deleting Objects

Technically, *Objects* never get deleted from the database, but if you need to remove an object from view, unlock it and invalidate all of the suggested *Labels* associated with it. When all *Labels* have been invalidated, the *Object*'s bounding box will be removed from the *Image.*

## Deleting Images

To permanently delete a camera trap image from the Animl platform from the image review panel, open the menu in the upper right hand corner of the panel (the icon looks like three "dots"), then select the "Delete" option.

You can also delete more than one image at a time by bulk-selecting images in the images table (to bulk-select, click the image at the start of the range of images you'd like to select, hold shift, and then select the image at the end of the range). Once your desired range of images is selected, right-click any of the selected images, and then click "Delete Images" from the menu that appears.&#x20;

{% hint style="info" %}
**NOTE:** This action can not be reversed at this time.
{% endhint %}

## Marking an Image as "empty"

Full disclosure: this is not intuitive and we're thinking about (and open to suggestions!) ways for improving this. But currently, there are a couple things to know about how to handle images without any animals or objects of interest in them:

* marking an *Image* as "empty" - both when a user does it manually or a machine learning model does it automatically - is essentially just adding an *Object* to the image with an "empty" *Label* that has a bounding-box that encompasses the entire image
* Images do not get automatically labeled as "empty" if you remove all Objects from them. **You still need to manually mark the&#x20;*****Image*****&#x20;as empty after invalidating all other&#x20;*****Label*****&#x20;suggestions on the&#x20;*****Image*****.**
* Similarly, if an ML model has incorrectly predicted that an image is empty and you add new Objects to it, the original "empty" object will not automatically be removed. **You still need to manually invalidate the "empty" object.**

To mark an image as "empty", either click the "Mark Empty" button at the bottom of the Image, or right-click anywhere on the image and select "Mark Empty" from the menu.

## Adding Tags

[*Tags*](/getting-started/structure-concepts-and-terminology#tags), are a little different that *Objects*/*Labels* in that they are intended to describe the entire image, rather than some object or animal within an image. Some examples of *Tags* might include "seen", "favorite", or "predation event". To apply them to an image, click the "+ Tag" button below the image, and select the tag you'd like to apply.

[^1]: "animal (or object of interest)


# Camera and Deployment management

Manage the cameras that belong to your Project

## Creating / deleting / updating Deployments

A "[Camera](/getting-started/structure-concepts-and-terminology#cameras)" in Animl is a representation of a physical camera trap that may be moved around and Deployed to different locations over the course of its working life. Cameras are identified by their Serial Numbers. A "[Deployment](/getting-started/structure-concepts-and-terminology#deployments)" in Animl is how we represent a specific Camera deployed at a specific location for a specific length of time (and provide a more human-readable name for the Deployment).

To create, edit, or update a *Deployment* within your Project, click on the “Manage Cameras and Deployments” button on the sidebar on the left (the camera icon), find the camera in the camera list, open the camera drop-down menu to the right (three dots icon), and select “Add Deployment” from the menu. Fill out the Add Deployment form and select a Start Date.&#x20;

{% hint style="info" %}
NOTE: the End Dates for Deployments are determined automatically. For example, if Deployment B starts after Deployment A, the End Date for Deployment A is the Start Date for Deployment B. If Deployment A is the most recent, an End Date will not be set as it’s considered a current and on-going Deployment.
{% endhint %}

Once the Deployment is created it will appear below the Camera in the list, and you can edit it (by clicking the "pencil" button to the right) or delete it at any time (by clicking the "x" button). Deleting a Deployment or changing its Start Date will not remove any of the images that previously belonged to it; instead, Animl will re-assign all images that were taken by the Camera based on the Start/End Dates of the new set of Deployment configurations.

## Registering a wireless Camera

To integrate a new wireless camera, you first need to pair, or "register" it with your *Project.* To do so, click on the “Manage Cameras and Deployments” button on the sidebar on the left (the camera icon), and on the bottom of the popup, type in the serial number of the camera, select the camera Make, and click “Register Camera”. If a camera trap camera is already registered to different project, the registration attempt will fail and display an error.

NOTE: it's not necessary to register non-wireless, traditional, SD-card-based cameras (the images from which would be uploaded via the [Bulk Upload](/fundamentals/uploading-images) feature).

## Releasing a wireless Camera

To release a Camera from which you no longer wish to receive images from (for example, if you were transferring a camera to a different Project), click on the “Manage Cameras and Deployments” button on the sidebar on the left (the camera icon), find the camera in the camera list, open the camera drop-down menu to the right (three dots icon), and select “Release camera” from the menu.&#x20;

## Editing a Camera's Serial Number

You can edit the Serial Number for non-wireless cameras at any time. To do so, from the Manage Camera popup, find the camera you'd like to modify, open the camera drop-down menu to the right (three dots icon), and select “Edit camera serial number” from the menu. You can then modify the Serial Number in the text box and click "Update".&#x20;

## Merging two Cameras together

If you'd like to combine the images from one Camera into another (for example, if you misspelled the [Serial Number Override](/fundamentals/uploading-images#overriding-serial-numbers) while uploading a batch of images that you wanted to be associated with an existing Camera in your Project), follow the steps above to open the edit serial number form for the camera you want to merge *from* (the "source" camera), and then input the Serial Number of the camera you want to merge *into* (the "target" camera) in the text box. When you click "Update", all of the images from both cameras will be combined and associated with the target Camera's Serial Number.

## Deleting a Camera and its images

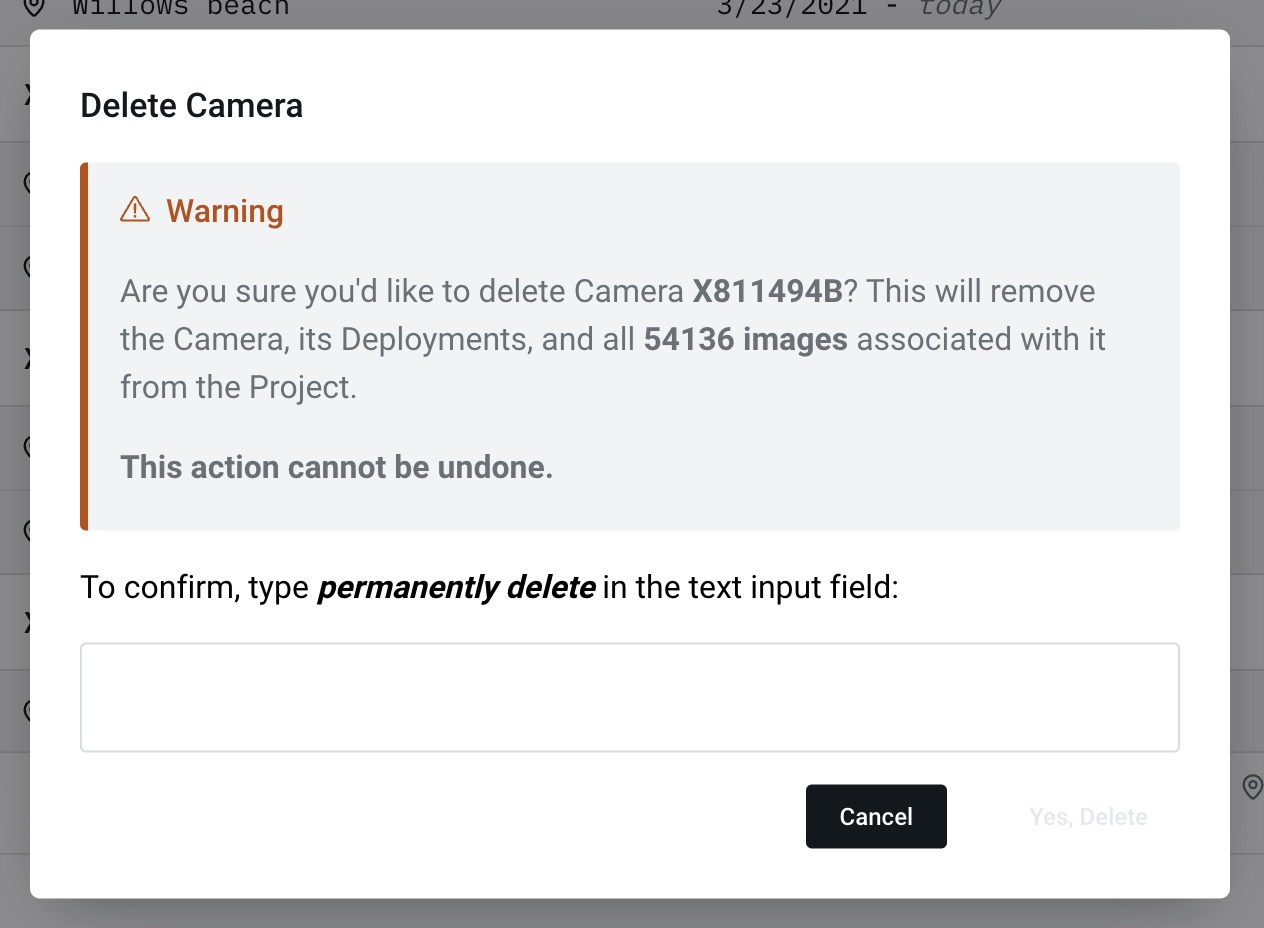
To delete a camera and all of the images associated with it, click on the “Manage Cameras and Deployments” button on the sidebar on the left (the camera icon), find the camera in the camera list, open the camera drop-down menu to the right (three dots icon), and select “Delete camera” from the menu.

This will remove the Camera, its Deployments, and all images associated with it from the Project. Use with caution, as this action cannot be undone!

<figure><img src="/files/cClqI2tlLj3aCf9bJMY7" alt=""><figcaption></figcaption></figure>


# Filtering images

Sort, filter, and query your data

## Filter by Deployment

In the Deployment section of the Filter Panel, you can filter you images by [Camera](/getting-started/structure-concepts-and-terminology#cameras) and [Deployment](/getting-started/structure-concepts-and-terminology#deployments).&#x20;

The structure of the Deployment filter is a bit unintuitive, so it's worth first understanding the relationship between Cameras and Deployments. Cameras can have multiple Deployments (to represent when a camera is moved to a new location, for example), and all Cameras are given an un-editable "default" Deployment with the naming pattern `<camera_serial_number> (default)`  (e.g. `HLPXMS03225269 (default)` ).

Every Image that gets uploaded needs to be associated with a Deployment, and the default Deployment serves as a catch-all in case (a) you choose not to create Deployments for your Cameras, or (b) you upload images belonging to that Camera *that were taken before the Start Date of the Camera's oldest Deployment*.

The default deployment is where images will land if you have (perhaps mistakenly) set the Start Date for a Deployment later than it actually was. If you find that you have images in your default Deployments that should be associated with a Deployment you've already created, simply adjust that Deployment's Start Date to be inclusive of those images that landed in default. More information on how to edit existing Deployments can be found [here](/fundamentals/camera-and-deployment-management#creating-deleting-updating-deployments).&#x20;

#### What's up with the nested checkboxes?

To save space in the user interface we decided that instead of creating a long, flat list of checkboxes to filter each Deployment, we should nest individual Deployment checkboxes under a parent checkbox. The parent (top-level) checkbox represents *all of the individual Deployments belonging to a particular Camera.* So by toggling the top-level checkbox on and off, you can show or hide all images taken by that Camera.&#x20;

If you want to show/hide images from individual Deployments, you can expand the top-level checkbox by clicking the caret icon to the right and toggling on/off the nested checkboxes that appear below. Each nested checkbox represents an single Deployment.

<figure><img src="/files/8MZofanG7IEOn5B56eUn" alt=""><figcaption><p>Deployment filters are nested. Each top-level checkbox represents all of the Deployments for a particular Camera. </p></figcaption></figure>

## Custom filters

Most of the filters are self-explanatory, but users who have “Project Manager” permissions will also have the ability to apply “Custom Filters” (i.e., submit [MongoDB queries](https://www.mongodb.com/docs/manual/tutorial/query-documents/) directly to the database and see the results). Feel free to copy, modify, and paste the custom filters below, but be sure to replace all text in `<angle_brackets>` with real values.

{% hint style="warning" %}
**Known limitation**

Custom Filters can NOT be saved in *Views*
{% endhint %}

{% hint style="info" %}
**Timestamps in queries**

If you include timestamps in your custom queries, be mindful that those timestamps are interpreted by the database as being in [UTC+0](https://en.wikipedia.org/wiki/UTC%2B00:00), *NOT* your local timezone. So, if you live in California and are including a timestamp of "2023-01-01", be aware that in your timezone, that same moment in time is actually 4:00 PM on December 31st, 2022.

If you're interested in submitting time-constrained queries relative to your timezone (or any timezone that's not UTC+0), be sure to calculate what that time would actually be in UTC+0 and include that in your [ISO 8601 Date string](https://en.wikipedia.org/wiki/ISO_8601) in your query.

For example, if you lived in California and want to get all images validated between **2023-01-01** and **2023-01-20** *in your timezone,* your start date would b&#x65;**"2023-01-01T08:00:00.000Z"** and your end date would be **"2023-01-21T07:59:59.999Z"**. It's worth pointing out here that to include all images validated on the last day of the date range (1/20), the end date will be in 1/21 in UTC.
{% endhint %}

### Useful queries

#### Query all images with labels validated by a specific user:

```mongodb
{ 'objects.labels.validation.userId': <users_email_address> }
```

#### Query all images labeled by anyone between two dates:

```mongodb
// NOTE: all date strings are interpreted in UTC+0
// be sure to adjust them accordingly if you'd like to query relative
// to a different timezone (see note above for more info)

{
    'objects.labels.validation.validationDate': {
        $gt: ISODate("2022-04-01"),
        $lt: ISODate("2022-04-30")
    }
}
```

#### Query all images with labels validated by a specific user between a range of dates:

<pre class="language-mongodb"><code class="lang-mongodb">// NOTE: all date strings are interpreted in UTC+0
// be sure to adjust them accordingly if you'd like to query relative
// to a different timezone (see note above for more info)
<strong>
</strong><strong>{
</strong>    'objects.labels': {
        $elemMatch: {
            $and: [{
	        'validation.userId': &#x3C;users_email_address>
            }, {
                'validation.validationDate': {
                    $gt: ISODate("2022-04-01"),
                    $lt: ISODate("2022-04-30")
                }
            }]
        }
    }
}
</code></pre>


# Views

Saving a set of filters

## Creating / updating / deleting views

To create a *View* (i.e., freeze the current filters so that you can easily return to them again later or share them with project team members), first set the *Filters* as desired, then click the “Save View” button (floppy disk icon) in the left-hand sidebar, click “Create New View”, and fill out the form. Similarly, if you are currently looking at a *View* that you’d like to make edits to, then update the filters, click that same “Save View” button in the sidebar, and click “Update current View”. To delete a View, simply click the trash can icon in the sidebar.

{% hint style="info" %}
**NOTE**: Edits to views apply to all other users in the same project.
{% endhint %}


# Automation Rules

Help Animl help you

*Automation Rules* offer a flexible tool for configuring automated machine learning pipelines and email alerts. Users can configure what event they’d like the automation rule to fire on (either an image being added to the system or a specific label being added to an image), and then what action they’d like to happen in response (e.g., send an email alert, request ML inference from a specific ML model).

{% hint style="info" %}
**NOTE:** Newly created *Automation Rules* will apply to all images added to your *Project* going forward. They do not apply retroactively to images that are already stored in your *Project*.
{% endhint %}

## Creating an automation rule to request ML predictions

To create an *Automation Rule*, elect the “Automation Rules” button (robot icon) from the left-hand sidebar, and fill out the form. A good initial rule to create is one that runs the [Megadetector](https://github.com/microsoft/CameraTraps/blob/main/megadetector.md) object detection algorithm on all images as they enter the system. To do so, complete form like so:

* Provide a name for the rule (e.g. “Request Megadetector prediction”)
* Trigger: “Image added”
* Action: “Request machine learning prediction”
* Model: “Megadetector”
* Confidence thresholds: 25% is a good default confidence for all for the classes predicted by Megadetector, but feel free to adjust if you find that Megadetector is missing a lot of a particular class (false negatives) or returning a lot of incorrect labels (false positives).

{% hint style="info" %}
**NOTE:** You can also disable classes entirely by unchecking the checkbox to the left of them. This is useful in places in which you do not expect vehicles to be in any of the images, so having to manually remove false positives is time-consuming and undesirable.
{% endhint %}

## Chaining together automation rules to create inference pipelines

Because one of the available “Trigger” events that automation rules can be set to execute on is “Label added”, and because when an ML model returns a prediction, it does in fact add a *Label* to a particular *Image* / *Object*, you can configure sequences of models to run your images through, depending on what labels were added in the previous inference step.

For example, if you have a fine-grained species classifier and you already have an automation rule set to request object detection from Megadetector on all new images (as described above), you can create a new rule to request predictions from the classifier only if Megadetector first returns an “animal” label, with the following settings:

* Name: anything really (e.g., “request classifier prediction”)
* Trigger: “Label Added”
* Label: “animal”
* Action: “Request machine learning prediction”
* Model: “\<name of classifier>”
* Confidence thresholds: Different models have different sensitivities, so getting confidence thresholds dialed in may require a bit of experimentation.

## Creating an automation rule for Alerts

If you’d like to receive automated alert emails if a species of interest is detected, you can set an alert to send when a label for that species is added by an ML model:

* Name: anything really (e.g. “Rodent alert”)
* Trigger: “Label Added”
* Label: “rodent”
* Action: “Send Alert”
* To: “\<user\_a\_email\_address>, \<user\_b\_email\_address>”


# Export Data

Exporting your labeled data for advanced analysis and ML training

To export a CSV or JSON file of your *Image*, *Object*, and *Label* metadata, perform the following steps:

1. Select the *View*/*Filters* you'd like to apply to your export
2. Click on the "Export Data" button on the bottom of the *Filters* panel (bottom left of screen)
3. Select which format you'd like to export your data in

{% hint style="info" %}
**Only reviewed images will be exported**

Currently, even if the "non-reviewed" filter is checked on, only fully reviewed *Images* and *Objects* will be exported. Similarly, only the "winning" *Labels* on *Objects* (the most recently validated *Label*) will be exported. All invalidated or non-validated *Labels* are ignored.
{% endhint %}

{% hint style="info" %}
**Timezones**

Be mindful that all date-time fields in all exports will be in UTC+0.&#x20;
{% endhint %}

## Supported export formats

### CSV

CSV export is helpful for ecological data analysis in Excel and [CamtrapR](https://cran.r-project.org/web/packages/camtrapR/index.html). It does not contain bounding-box information for the *Objects*.&#x20;

### COCO for Camera Traps

[COCO for Camera Traps](https://github.com/Microsoft/CameraTraps/blob/main/data_management/README.md#coco-cameratraps-format) is helpful for pulling *Image* and annotation data into a machine learning training workflow. The *Object* records (annotations) do contain bounding box information.

## Exporting image files

Currently you need to have special AWS permissions and some basic familiarity with a command line interface to export/download your image files. If you need access, please reach out to Nathaniel at <nathaniel.rindlaub@tnc.org> for support.&#x20;

The image export process entails the following steps:

1. Procure the necessary AWS credentials
2. Install the [AWS CLI](https://docs.aws.amazon.com/cli/latest/userguide/getting-started-install.html) and configure a new named "profile" (the profile name **must** be `animl`)
3. Clone and follow the setup instructions in the [animl-analytics](https://github.com/tnc-ca-geo/animl-analytics/blob/main/README.md) GitHub repository
4. Run the `utils/download_images.py` script as described in the animl-analytics documentation


# User management

## Project roles

Only Project Managers (level 3, see below) can add/remove users and manage project roles.&#x20;

There are three project role tiers available:

* **Level 1 - Project Observer -** Project Observers have read-only roles. This may be useful in certain situations, e.g., to allow ecologists or researchers outside of your organization who want to view reviewed, validated data for research purposes but don’t necessarily need to edit the data.
* **Level 2 - Project Member -** Project Members can help review and edit image *Labels* and can create *Views* to help with their review workflow. They cannot edit inference pipelines, edit deployments, or register/release *Cameras*.&#x20;
* **Level 3 - Project Manager** - Project managers can register and release *Cameras* to their *Projects*, configure inference (machine learning) pipelines and *Alerts*, see all *Images* that belong to their *Projects*, and edit *Labels*. They can also create and edit *Views,* add Users and manage their permissions, and upload images directly from their computers.

## Adding users

To add users to your Project, click the "Manage users" button (person icon) from the left hand side bar and click "Add user". Once you've entered the new user's email address and selected their role, clicking "Add user" again will send them an automated email invitation to them from "<no-reply@verificationemail.com>" with a temporary password.&#x20;

If they don't see an email arrive in their inbox shortly there after, be sure to have them check any spam/junk folders and email filtering services they may be using. If you are adding a user with a Nature Conservancy email address (@tnc.org), note that TNC's Postmaster email filtering service often thinks these emails are spam and will place them on hold. To view emails on hold and release them, log into the Mimecast personal portal [here](https://tnclogin.login-us.mimecast.com/u/login/?gta=portal#/login).

The temporary password will expire in 7 days.

## Editing users and project roles

To edit users and project roles, click the "Manage users" button (person icon) from the left hand side bar.&#x20;

* To edit a user who has already been added to a project, click the "Edit user roles" button (pencil icon) and update the "Project role" accordingly.
* To remove a user from a project, click the "Edit user roles" button (pencil icon) and deselect all "Project Roles".

## Re-sending users' temporary passwords

When a user is added to a Project, they will be sent an invitation and temporary password via email. If they fail to sign into Animl and reset their temporary password before it expires, Project Manages can re-send new temporary passwords via the "Manage users" popup.&#x20;

<figure><img src="/files/LpTXYj7KhO6ILo8T2kCK" alt=""><figcaption></figcaption></figure>


# Deleting images

Permanently delete images from your project

## Deleting single images

When viewing a full-sized image, you can delete it by clicking on the three-dot menu icon in the upper right hand corner, selecting "Delete image" from the drop-down menu, and completing the confirmation prompt that appears.

<figure><img src="/files/Q04oJ5yTHFYwWWbMoN1P" alt=""><figcaption></figcaption></figure>

## Deleting a selection of multiple images

You can delete one or more images in the images list by clicking the first image you'd like to delete then shift + clicking the last image you'd like to delete in the range. Once the images have been selected, right-click any of them to open a popup menu, select "Delete images", and complete the confirmation prompt that appears.

<figure><img src="/files/Uh8pd4AMpKVk8g6hxY45" alt=""><figcaption></figcaption></figure>

## Deleting all currently filtered images

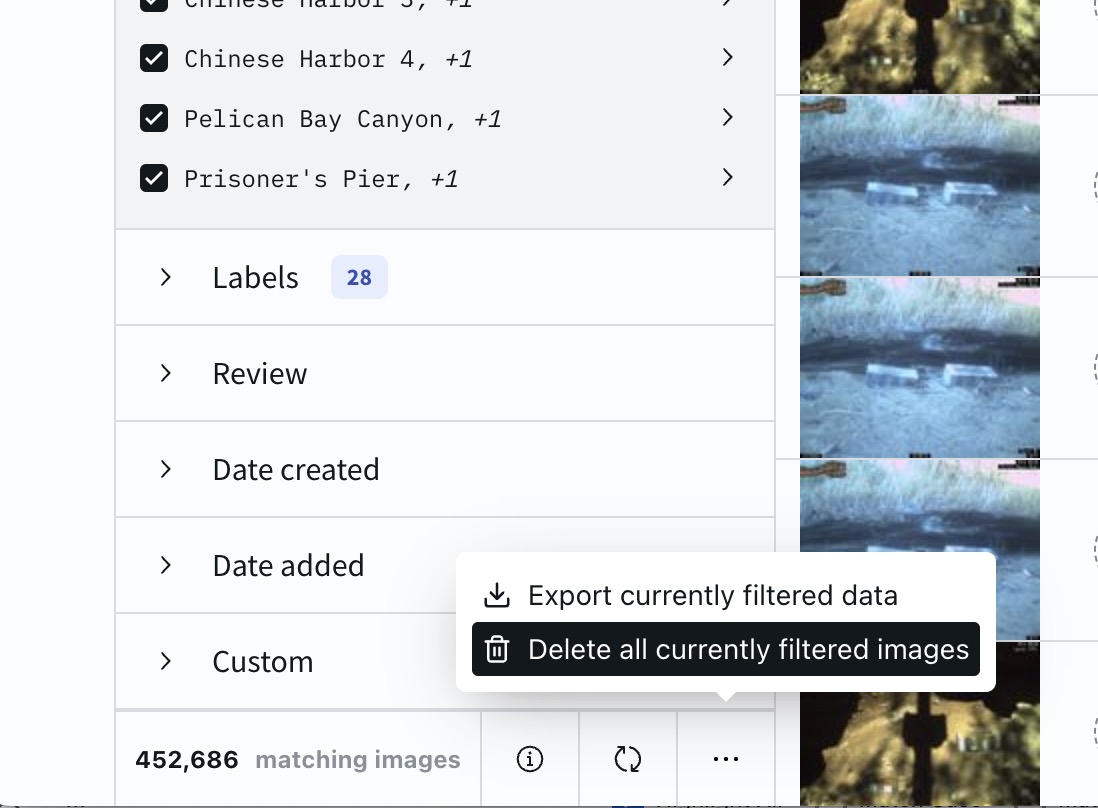
If you would like to delete all of the images that match the current selection of filters - for example, perhaps you'd like to delete all images with people in them, or all images from a certain camera taken before a certain date, or all of the images in your project entirely - select the three-dot menu item from the bottom of the Filters Panel, select "Delete all currently filtered images", and complete the confirmation prompt that appears.

{% hint style="info" %}
**Deletion limits**

Animl supports deleting a maximum of 200,000 images at a time when deleting images by filter.

If the number of images that match your current filters exceeds 200k, you may need to apply additional filters to stay within the limit and perform multiple separate deletion requests to complete the task.
{% endhint %}

<figure><img src="/files/8QNR4n9Xl4nc635PnLYB" alt=""><figcaption></figcaption></figure>


# Guide to real-time wireless camera trapping

To learn more about deploying wireless camera traps check out or guide!

<https://guides.animl.camera/>


# Terms of Service

By using Animl, you agree to these Terms of Service

The Nature Conservancy (“we”, “us” or “TNC”) is pleased to provide Animl software and services (“Animl”) to you or your current employees. If you are using Animl on behalf of a business (such as your employer), that business accepts these terms of service (“Terms”) by your use.  In that case, the words “you” and “your” in these Terms refers to that business.

The Terms govern your access to and use of Animl, so please carefully read them and our [Privacy Policy](http://www.nature.org/about-us/governance/privacy-policy.xml) before using Animl. By using Animl, you agree to be bound by these Terms and by our Privacy Policy. If you don’t agree with these Terms and our Privacy Policy, you cannot use Animl in any way or at any time.

### **Your Data: Your Rights and Your Privacy**

We developed Animl to help you manage your camera trap data. Animl allows you to share information with us and other users of Animl. You agree to allow the Animl platform to host that information, but you are NOT required to share any of the information including images, metadata, annotations, and labels that you upload to Animl (your “Data”). Data does not include code modifications that are part of the open source repository for Animl. You retain full ownership to your Data. We do not claim any ownership to any of it. These Terms do not grant us any right to your Data or intellectual property except for the limited rights that we require to administer Animl, as explained below.

Please refer to our [Privacy Policy](http://www.nature.org/about-us/governance/privacy-policy.xml) for a description of how we collect, use and disclose Animl information (“Content”), including your Data.&#x20;

We have the right to withdraw or change Animl or any Content. As we describe below, we will not be liable to you if for any reason all or any part of Animl is unavailable at any time or for any length of time.&#x20;

### **Your Responsibilities**

Content in Animl may be protected by intellectual property rights of others. Only upload your Data if you have all necessary rights to that Data and have all necessary rights to share it on Animl if you choose to do so. Please respect confidentiality obligations. You are solely responsible for your conduct, the content of your Data and your communications with others while using Animl.  It is your responsibility to ensure that you have the rights or permission needed to comply with these Terms.&#x20;

Respect the law. It is your responsibility to know and comply with applicable laws and regulations with regards to camera traps and remote monitoring. Do not use Animl for any fraudulent or unlawful purpose including violations of statutory, regulatory or contractual law. Respect copyright, trademark, privacy, financial disclosure, libel, defamation, trade secret, data protection and all other laws. Obtain permission before uploading material belonging to others. Do not attempt to impersonate any other individual on Animl; you must always use your true identity.

TNC expects itself and everyone with whom it does business to conduct themselves in ways that are consistent with its TNC’s Code of Conduct found at [www.nature.org/codeofconduct](http://www.nature.org/codeofconduct).&#x20;

Without TNC’s express written consent, you may not use, display, mirror, or frame Animl, any element within Animl, or any proprietary elements belonging to TNC (including but not limited to TNC logos and marks). In addition to adhering to all applicable laws and regulations, you may NOT do any of the following:

* resell Animl or the Content, or any portion thereof;&#x20;
* access or search the Content or download Content by using any engine, software, tool, agent, device or mechanism (including spiders, robots, crawlers, data mining tools or the like) other than the software and/or search agents that TNC provides or authorizes;&#x20;
* probe, scan, tamper with, or test the vulnerability of Animl or any TNC system or network;
* avoid, breach, deactivate, impair, or circumvent any security or authentication measures, including those that protect Animl and the Content;
* attempt to decipher, decompile, disassemble or reverse engineer any of the software used to provide Animl or the Content;&#x20;
* interfere with, or attempt to interfere with, the access of any user, host or network, including, without limitation, by sending a virus, overloading, or flooding Animl;&#x20;
* encourage or enable anyone else to do any of the foregoing.

Although we’re not obligated to monitor and control access to or use of Animl or to review or edit any Content, we have the right to do so to operate Animl, ensure compliance with these Terms, and comply with applicable legal requirements. We have the right to investigate violations of these Terms or conduct that affects the Services. We may also consult and cooperate with law enforcement authorities to prosecute users who violate the law.

### **Content**

Using Animl or uploading your Data does not give you ownership of any intellectual property rights in Animl or in Content (other than your own Data) that you may access or use. TNC and its licensors exclusively own all right, title and interest in and to Animl, including all associated intellectual property rights. Don’t remove, obscure, or alter any legal notices displayed in or along with Animl.&#x20;

All Users are encouraged to make appropriate attributions to copyright owners when referencing their material. We have the right to remove content and take technical and legal steps to bar you from using Animl if we think you have violated these Terms. YOU WAIVE AND HOLD HARMLESS TNC AND ITS AFFILIATES AND SERVICE PROVIDERS FROM ANY CLAIMS RESULTING FROM ANY UNAUTHORIZED USE OF CONTENT YOU UPLOAD, POST OR USE IN ANIML.&#x20;

These Terms do not grant you the right to use any of our branding or logos or name. You must not use our name or logo or branding without our written permission, except to cite The Nature Conservancy’s development and ownership of Animl in a factual manner that does not imply any endorsement of Your or anyone else’s products, services, or businesses

### **Account Information and Security**

You will be assigned a username and password to access Animl. You agree not to use the username or password of another person at any time or to disclose your password to any third party. You agree to notify us immediately if you suspect any unauthorized use of your username or access to your password. You are solely responsible for any and all uses of your username and password, as well as all activities that occur under your Account, whether or not you know about them. You can deactivate your account at any time by sending an email to Animl at tnc dot org with “Deactivate my Account” in the subject line.

It’s important that you provide us with accurate, complete and up-to-date information for your Account and you agree to update such information to keep it accurate and complete. If you don’t, we might have to suspend or terminate your Account.&#x20;

### **Rights You Grant in Your Data for Animl System Administration**

By uploading your Data, you hereby grant to TNC a non-exclusive, transferable, sub licensable, worldwide, royalty-free license to use, copy, modify, create derivative works based upon your Data in connection with operating and providing Animl to you and to other Animl users.&#x20;

You are solely responsible for all your Data. You represent and warrant that you own all your Data or that you have all necessary rights to grant us the license rights in your Data under these Terms. You also represent and warrant that neither your Data, nor your use and provision of your Data to be made available through Animl, nor any use of your Data by TNC on or through the Animl will infringe, misappropriate, or violate a third party’s intellectual property rights, or rights of privacy, or result in the violation of any applicable law or regulation.

You can remove your Data by specifically deleting it. However, in certain instances, some of your Data (such as summaries aggregating your Data with other Content) may not be completely removed and copies of your Data may continue to exist on Animl. We are not responsible or liable for the removal or deletion of (or the failure to remove or delete) any of your Data.

### **Rights you grant in your data for other purposes**

TNC will not display or distribute your Data (including using your Data to train machine learning models) for purposes other than system administration without your consent.

### **Rights That TNC Grants You**

The Nature Conservancy is the author and owner of the Animl code, including all copyrights in Animl. We grant you a license, free of charge, to use this Animl software and associated documentation files (the “Software”) for noncommercial or academic purposes, including the rights to use, copy, modify, merge, publish, or distribute, or sublicense the Software, and to permit persons to whom the Software is furnished to do so, subject to the following conditions:

* You must include the following copyright notice and this permission notice in all copies or substantial portions of the Software: “© The Nature Conservancy, 2023. The Nature Conservancy is the author and owner of the Animl code, version, including all copyrights in Animl. Only for noncommercial or academic use.”
* While you may download and modify the code for use cases outside of conservation, you must remove our logo from the code.&#x20;

### **Disclaimers, Limited Liability and Indemnity**

THE SOFTWARE IS PROVIDED “AS IS” AND “AS AVAILABLE,” WITHOUT WARRANTY OF ANY KIND, EXPRESS OR IMPLIED, INCLUDING BUT NOT LIMITED TO THE WARRANTIES OF MERCHANTABILITY, FITNESS FOR A PARTICULAR PURPOSE, QUIET ENJOYMENT, AND NON INFRINGEMENT. TNC MAKES NO WARRANTY AS TO THE QUALITY, ACCURACY, COMPLETENESS, TIMELINESS, OR RELIABILITY OF ANIML OR ANY ANIML CONTENT.&#x20;

TNC MAKES NO REPRESENTATIONS OR WARRANTIES THAT YOUR USE OF ANIML WILL MEET YOUR NEEDS OR BE UNINTERRUPTED, SECURE, OR ERROR FREE. USERS ARE RESPONSIBLE FOR TAKING ALL NECESSARY PRECAUTIONS TO ENSURE THAT ANY CONTENT YOU MAY OBTAIN FROM THE SERVICES IS FREE OF VIRUSES OR OTHER HARMFUL CODE.

TO THE MAXIMUM EXTENT PERMITTED BY LAW, TNC SHALL NOT BE LIABLE FOR CREATING, PRODUCING, MAINTAINING, OPERATING, OR PROVIDING ANIML or ANIML CONTENT, UNDER ANY THEORY BASED IN CONTRACT, WARRANTY, TORT (INCLUDING NEGLIGENCE), PRODUCT LIABILITY, STRICT LIABILITY, OR OTHER LEGAL THEORY. THIS LIMITATION ON LIABILITY INCLUDES ANY AND ALL INDIRECT, INCIDENTAL, SPECIAL, EXEMPLARY OR CONSEQUENTIAL DAMAGES, INCLUDING LOST PROFITS, LOSS OF DATA OR GOODWILL, SERVICE INTERRUPTION, COMPUTER DAMAGE OR SYSTEM FAILURE OR THE COST OF SUBSTITUTE SERVICES ARISING OUT OF OR IN CONNECTION WITH THESE TERMS OR FROM THE USE OF OR INABILITY TO USE ANIML, EVEN IF TNC HAS BEEN ADVISED OF THE POSSIBILITY OF SUCH DAMAGES.

THE ABOVE EXCLUSIONS AND LIMITATIONS OF DAMAGES ARE FUNDAMENTAL ELEMENTS OF THE BASIS OF THE BARGAIN BETWEEN TNC AND YOU.

INDEMNITY. You agree to release, indemnify, defend and hold harmless TNC, its subsidiaries, and affiliates, and their respective officers, directors, agents, partners and employees, from and against any claims, disputes, demands, liabilities, damages, losses, and costs and expenses, including, without limitation, reasonable legal and accounting fees arising out of or in any way connected with (i) your access to or use of Animl, (ii) your Data, or (iii) your violation of these Terms.

### **Termination**

We may terminate your access to and use of Animl, at our sole discretion, at any time and without notice to you. You may cancel your Account at any time by sending an email to us at Animl at tnc dot org. Upon any termination, discontinuation or cancellation of Animl or your Account, all provisions of these Terms that by their nature should survive will survive. This includes, for example ownership provisions, warranty disclaimers, and limitations of liability.

### **Modifying our Terms of Service**

We may update these Terms from time to time, at our sole discretion. We may notify you of such updates by any reasonable means, such as by posting the revised Terms on the Animl website. Please look at the “LAST UPDATED” legend above to see when these Terms were last revised. Your use of Animl after the posting of any revised Terms means that you accept and agree to be bound by the revised Terms. If you don’t agree to be bound by the revised Terms, then you may not use Animl anymore. You can stop using Animl at any time. We may also stop providing Animl to you, or add or create new limits to Animl at any time.&#x20;

### **General Terms**

These Terms are the entire and exclusive agreement between TNC and you regarding Animl and these Terms supersede and replace any prior agreements between TNC and you regarding Animl.&#x20;

These terms do not create any third party beneficiary rights. You may not assign or transfer these Terms, by operation of law or otherwise, without TNC’s prior written consent. Any attempt to do so will be null. Subject to the foregoing, these Terms will bind your successors and permitted assigns. TNC may freely assign or transfer these Terms without restriction.&#x20;

If you do not comply with these Terms, and we do not take action right away, this does not mean that we are giving up any rights that we may have to take action in the future or seek all available remedies.

If it turns out that a particular provision of these Terms is not fully valid or enforceable, that provision will be enforced to the maximum extent permissible, and this will not affect any other Terms.

All claims arising out of this Agreement or relating to Animl  will be governed by the laws of the State of California excluding the application of its conflicts of law rules. Any legal action or proceeding arising out of this Agreement or relating to these Services shall be brought exclusively in a state or federal court in or for San Francisco, California.